Activity
Media
Photography
Materials
A camera (digital SLR, point and shoot, or cell phone), light, patience and a keen eye, some way to share your photographs, preferably as prints
Download This Activity
About Open Studio
Designed by practicing artists, the Open Studio classroom activities aim to connect high school teachers and students with key ideas and issues in contemporary art. See all of the Open Studio activities.
Assignment
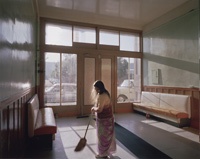
Janet Delaney, Park Hotel, Owned by the Patel Family, 1049 Folsom Street, San Francisco, 1980; Collection SFMOMA, Gift of the artist; © Janet Delaney
Photography means “to write with light.” Just as knowledge of grammar and vocabulary contributes to effective writing, knowing a few tools for image-making can help you improve your ability to communicate with the camera. One of the most important tools is light. By paying attention to the specific qualities of light, you can make more expressive photographs.
In this assignment you will consider various kinds of lighting conditions. Working in black and white may be an excellent way to focus your attention on the quality of light. You might try this assignment in black and white and then repeat in color. With color, the quality of light changes depending on the time of day and the source of light.
Instructions
Make 20 images under each of the following lighting scenarios. You will need to carry your camera with you every day and everywhere you go to be ready for the right light!
1. Open Shade
Find a scene that has no distinct shadows or bright highlights. You will find this sort of light on the north side of a building or on a cloudy day. The even lighting will allow you to see detail in all parts of the image. This is good light for portraits because the subject will not be squinting. Look at the work of Richard Avedon in The American West. All of these images were made in open shade.
2. High-Contrast Light
Photograph in the late afternoon when the sun is setting and the shadows are long. Certain elements in the image will be highlighted and others will disappear into the shadows. This dramatic lighting sets a mood of mystery. Look at Ray Metzker’s work in Chicago, most of Rinko Kawauchi, and Alex Webb’s The Suffering of Light for good examples of this kind of lighting.
3. Indoors during the Day
Use light from an open door or window to illuminate your subject. Try moving the subject near the window to take maximum advantage of the light. Avoid including the window or door in the frame because they will be extremely bright and could be distracting. Look at the paintings of Johannes Vermeer for inspiration. There are also many good examples in the book Sweet Flypaper of Life by Langston Hughes and Roy Decarava.
4. Night Photography
Use available light from street lamps, signs, car headlights, the moon, or any other light source. You may want to use a tripod or stabilize your camera to avoid motion during the long exposures needed to make images under low light. Don’t be afraid to make messy photos with long exposures. Try taking a portrait under these conditions. Your subject will have to stay very still. Look at the work of Michael Kenna, or at Brassaï’s Paris at Night. For examples of color work at night, look at Todd Hido’s House Hunting and the highly stylized work of Gregory Crewdson.
Print your best image from each of these lighting situations. Write down what you think was successful and what you would like to do differently in each image. During class critique, listen to feedback from your classmates. Did they have the same response to your images that you did? Discuss the work of your fellow students. Consider how each of you approached this assignment and write down what you did that was similar and what was different.
